


The Post Everyone Keeps Asking Us About
- Brian
- Jun 7, 2021
- 11 min read

Developing a floor plan and a virtual tour.
OK, it has been way too long since I last posted regarding the house design, so please feel free to refresh yourself by reading my preliminary design post, “Starting from Scratch, A ‘Lot’ of Ideas,” and/or my nitty gritty post, "I want to build. Is this feasible?" In these posts I determined the location of the house, driveway, views, slopes, etc. This post will focus specifically on the design of the house itself (AKA the Floor Plan). I will do a quick overview of my process, followed by a tour of the main and upper floor plans describing the reasoning/concepts behind each room.
I began by grabbing a pencil, paper, and drawing the main floor, which at this point was a bunch of incoherent boxes. The guidelines I followed were determined based on the lot analysis in my previous post:
1.) The garage will be on the north end of the house with garage door access from the west. This will minimize driveway distance and allow the garage to be on the main floor.
2.) The kitchen needs to be close to the garage, preferably on an exterior wall with windows to the east.
3.) The main entrance to the house will be on the west. Due to setbacks, restrictions, and access, an entrance on any other side could get weird.
4.) Given the topography, my desire for a walkout/daylight basement is very much in play. If we did not do the basement, there would likely be an 8-foot-tall crawl space in spots.
5.) The house footprint is restricted to 110’ north to south, and 50’ east to west, primarily due to wetland buffers and boundary setbacks. This is a large footprint, but there is certainly some east/west restriction we must consider.
6.) Best scenery is to the east (peek-a-boo mountains, forest, and EPIC baby goats in their pasture... Queue goat photos now).


7.) Place the master away from the “loud” part of the house if possible.
8.) We are planning on building most of this house ourselves; so, keep the design somewhat simple.
I continued sketching, one iteration after another, moving walls here and there, re-proportioning rooms until I had the basic concept.
Once I felt that I had my floor plan about 75% figured out I got a hold of a local architect. He is well known to our community and has built several houses and other projects in the area. My instructions to the architect were to use my sketch as a conceptual drawing, but feel free to scrap the entire thing if it seemed too quirky. I did not take the drawing to the final phases of calculating roof lines, overhangs, or construction requirements but it was plenty to get the point across. He also came out to the site for a visit before starting the design. I showed him where the house was going to be located and provided him a topography of the lot (which we surveyed ourselves using a transit and grade rod. (There will be a post on this in the future). The architect got the picture, and he asked how much I wanted to spend. I just said, it doesn’t really matter, just don’t make the house much bigger than I drew it, given it was probably a little larger than I wanted already.

A few weeks later the architect called and said he had a draft for me. I looked at the draft, and with some minor changes and plenty of cleaning up, it looked familiar. The floor plan I provided was retained for the most part; I could tell some walls moved, some rooms became bigger, some positions slightly different, some doors relocated, and some window sizes changed. I also was wondering how he managed to meet my requirements so easily and make everything fit so nicely. I guess that is why you get the pros involved? After looking closer I did notice that he increased the size of the main floor by a about 350 square feet... “So that is how they do it,” I said to myself. Well, in the end I really liked what he did, so I decided to keep most of the changes.
We did another pass or two and refined the design a bit further. With the adjusted dimensions he provided, I drew up a master bath and kitchen layout that I liked, and he incorporated them into the drawing. We also went back and forth on whether to have two stairwells between the main and upper floors, but I eventually caved to his recommendation and included two (it was my idea in the first place, but I thought it was a little excessive after getting further into the design. In hindsight, that second stairwell ultimately saved us some excavation work, and some concrete). Below are images of the almost finalized main floor plan. Note: The floor plans do not show all the details with partition walls, half walls, interior windows, sliding doors etc., but the bulk of the design is completed here.
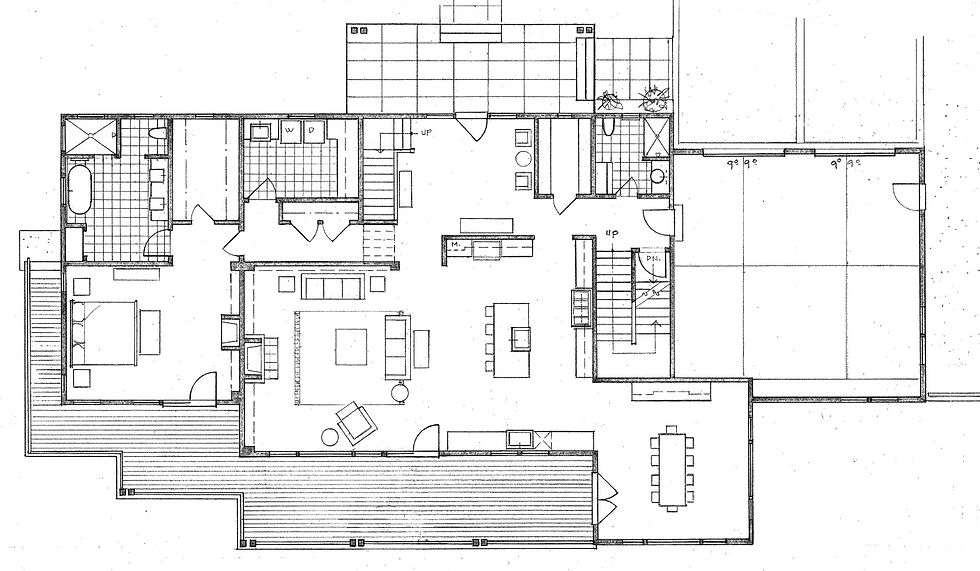
Alright! Now that you know the story of how the floor plan was developed, please join me for a virtual floor plan tour! I will describe the floor plan going room-by-room, expanding on some of the thought behind each.
Main Floor Plan:
Garage (Far right, north): This is a 28’x28’ garage with two (10’ wide) garage doors. As mentioned previously, the best access to the house was from the northwest, so I placed the garage accordingly. I left adequate size for two cars with additional room for some workspace. The driveway will terminate in front of the garage and allows for about 41’ between the west boundary and the garage doors. This is not a ton of room to maneuver exceptionally large vehicles, but is plenty for our normal use and it is about all we would be able to manage given the topography and setbacks on the lot.

Hall 1 and Stairwell: Upon entering the house from the garage there is a short hallway, main floor (guest) bathroom to the right, and stairwell to the left. This stairwell was placed immediately upon entering the house with the primary purpose of quick access to the bonus room above the garage. I am jumping ahead here, but as the bonus will be used for storing all my outdoor gear and I want to avoid traipsing it through the entire house. I even entertained the idea of putting the stairwell in the garage, such that the bonus was only accessible from the garage, but the interior stairwell ended up doubling as basement access.
Main/Guest Bath: The main floor bathroom layout is not finalized in the drawing, but the idea is that it was close to the kitchen, but still somewhat out of the way for privacy.
Kitchen/Pantry: This house was truly designed around the kitchen; in my mind the kitchen is the “heart” of the house. I wanted to design a kitchen that had plenty of room for ingress/egress, and enough counter space for 3 cooks to get busy. I specifically wanted the kitchen to have quick access to the garage so the distance to carry groceries is minimized. Also note there are two sinks in this kitchen, one primarily for prep, the other located next to the dishwasher primarily for cleaning. Out of all features I have used in a kitchen, the dual sink approach is one that I like most. This kitchen is laid out with the idea that the west side of the kitchen is for food storage and pantry, the middle is food prep, and the east is cleanup. This should provide nice flow when dealing with meals for large numbers of people.
I also opened the kitchen up to the living room. Not shown in the drawings will be some beam work and maybe a small divider counter of partial half walls between the kitchen and living to segregate the two slightly.

Dining/Breakfast: Adjacent (north/east) of the kitchen is open to the dining/breakfast room. This room is a favorite of mine; the idea here is that it will have glass on 3 sides including a large glass French door, leading to the covered porch/deck, and 3 windows each on the east and north walls. This room I informally call the “breakfast” room because it is the first point of the house to get hit by sunlight in the morning. The room will have a bit of a “screened-in-porch” feel and will have a large table in the middle (There are definitely some farmhouse elements here; and we have goats, so it’s okay). On the north wall of this room there will be some cabinetry with a small undercounter refrigerator and sink to serve as a coffee/tea bar and can double as space for serving meals.
Living: The living room is open to the kitchen and has a lot of glass to the east including 2 large double hung windows, a 6’x6’ picture window, and a 6’x8’ glass French door (also leading out to the covered deck). This room, along with the kitchen and dining, will have a pleasant view out to the wooded pasture. The living room will have a wood-burning (or possibly wood/propane) fireplace and other standard living room shit. I sized this living room to be large (again with plenty of ingress/egress space), but not so large that it will feel cavernous. Also, we intend to do some beam work, or coffering on the ceiling to add to the overall style of the house, but we have not decided exactly what we are doing there just yet.
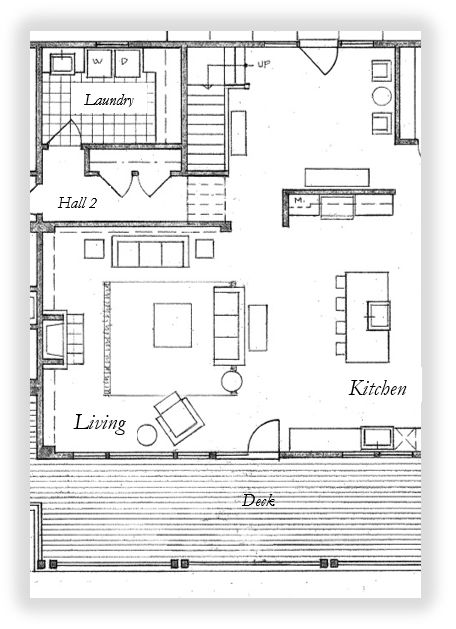
Hall 2 and Laundry: As we move further south/west in the house we have another hallway that leads to the laundry and master suite. I placed the laundry room down this hallway, somewhat out of the way, but with quick access to the master bedroom. I feel for my lifestyle this is the most convenient place to put it. I also put the laundry room on an exterior wall (it just makes the dryer vent easier to run) and placed a window in the room for some natural light. I made this room larger than the average laundry room because I like to prioritize space for rooms in which work is done. I left room for hang drying clothes and extra deep counters for folding.
Master Suite: I had two requirements for the master bedroom: 1.) It would be placed on the main floor (refer to previous posts about our love for knee surgeries and the goal to avoid stairs to get to bed) and 2.) That it be placed in the quietest location possible. In this case the quietest location was away from the kitchen. The master suite also does not have a basement below or floor above it, so it is truly its own “wing” of the house. The intention is to use extra soundproofing on the wall between the master suite and the rest of the house. (Can you tell I am a terribly light sleeper? It would be cheaper to just go to more metal concerts and fuck up my hearing, but for now I will take the soundproofing approach).
The master bedroom will be a cool spot; it has its own fireplace (my hope is wood burning, but we will see if fire code lets us get away with that), a vaulted ceiling, and direct access to the covered porch/deck via yet another large French door. The master bedroom will have stonework on the fireplace and beams (not shown in the drawing) on the ceiling. The west end of the master suite has a modest sized walk-in closet and the master bath.

The master bath has a separate tub and shower, 2 sinks, and a separate toilet closet. The shower will have 2 awning windows (1 on each exterior wall) and a skylight to allow lots of light in (Bri has some rainforest shower idea she saw on Instagram... so that should be fun).
Entryway/Foyer: To finalize the “virtual tour” of the main floor, we head back to center-west of the house to the foyer. This foyer will be open to above, where you will find a stairwell up to a central balcony. The upper level ceilings are vaulted, which will make the final ceiling height above the entry way floor as high as 24’. Of course, I can’t let something like that go unutilized, so on the north wall of the foyer we will be installing a climbing wall.

Upper Floor Plan:
From the entry way we head up the stairs to the top floor; below is picture of the upper floor plan.
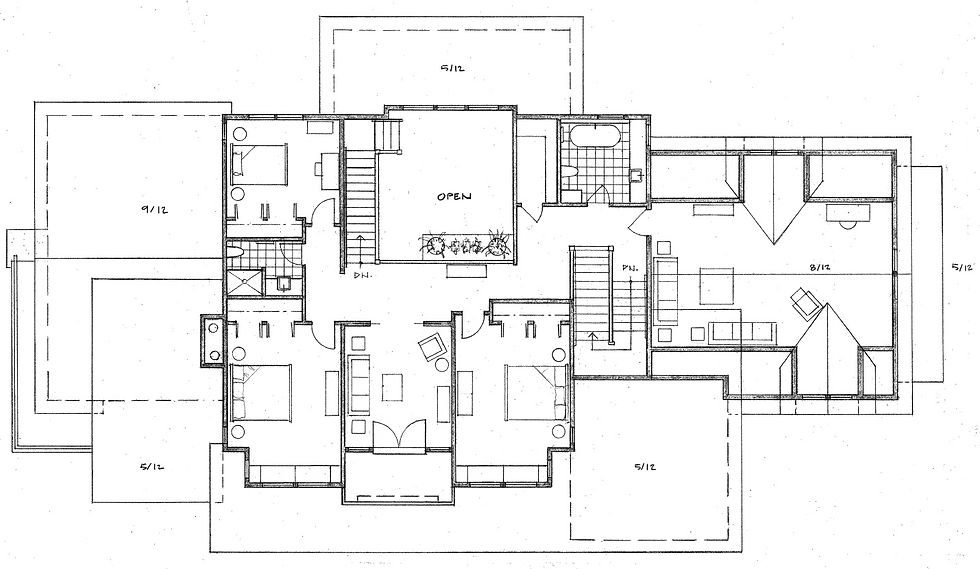
Common Hallway: Going up the stars will land you at a common hallway with the balcony that overlooks the entry way. There are two bedrooms to the east (that are basically mirror images of each other), and one bedroom/office in the southwest corner. There is a sitting room (that we have dubbed the “Zen room”) also to the east, centered on the house. There is a utility closet, 2 bathrooms and the bonus room on the upper floor and all are accessible via the “common” hallway.

Zen Room: The Zen room has a small outdoor veranda with a view to the east. This will be a nice spot to sit up in the trees with glimpses of the mountains. The Zen room will have a large glass French door that leads to the veranda, and two 6’ tall windows on either side of the doors, allowing a lot of light into the room. This room will probably have 2 skylights as well (this may be a game-day decision). My idea with this room was to build high enough that we could see the mountains. The foyer (mentioned earlier) to the west of the Zen room has 3 large windows up high that will allow light through the foyer, over the balcony at the top of the stairs, and through the large doorway to the Zen room in the evening. (Light will enter this room from both the west and the east). The outdoor veranda also provides ample zip line opportunities.
Bedrooms: I didn’t really put a ton of thought into the upstairs bedrooms; I simply wanted them to be of reasonable size, utilize the nice view to the east, and add some charm with vaulted ceilings. Each bedroom will have a dormer that juts out to the east with windows on 3 sides, and a sitting bench. The drawings show a 3rd bedroom upstairs, but it will primarily be used as office space, nothing too fancy there, just some room for my work stuff...

Bathrooms: One of the more “luxury” requests I made when designing this house was that for every two bedrooms there needs to be at least 1 bathroom. With up to 3 possible bedrooms upstairs that requires two bathrooms. One of the bathrooms is small, but it will serve its purpose. The other bathroom is a bit larger, and its final layout is TBD.
Bonus: To finalize the tour of the upstairs, we head to the bonus room which will be primarily used for storing all my hiking, climbing, and ski gear. To elaborate more on the space, this is a character rich room itself. The ceilings are not quite as high, with only 6 foot walls at the sides, and a vaulted ceiling topping out at about 10’. There are windows in the west, north, and east directions, and should prove to be a pleasant space if ever used for a bedroom, or even with the option of a mother-in-law.

Basement: Finally, as we exit the bonus room, a quick left down the stairwell and 2 floors below will put you in the basement. I did not provide an image of the basement, but it is about 1200 square feet and sits directly underneath the kitchen, living, and dining rooms. This is a walk-out basement to the east and has several windows and a French door that will lead out to the patio below the main floor deck. The basement was included because it just made sense due to the slope of the lot. We already had the vertical height to include it, so we did. I do have some ideas for this space, but primarily it will be used for storage, a small workshop space, and a gym.
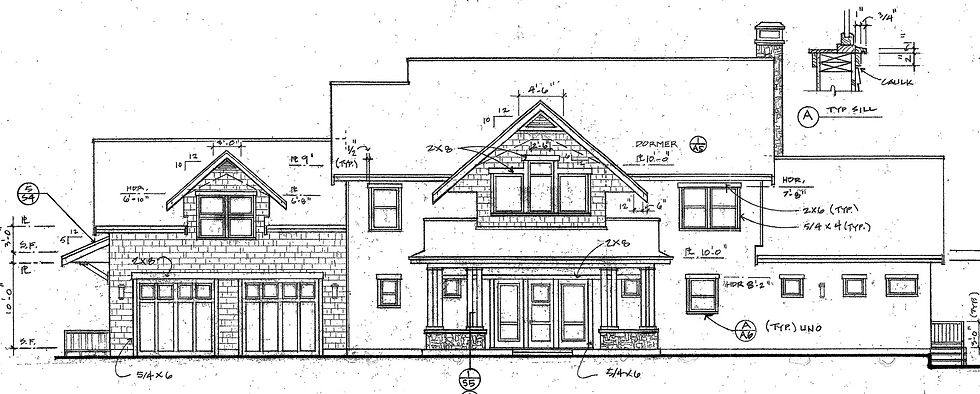
This concludes the virtual floor plan tour! Thank you for visiting. Please enjoy our west and east elevation drawings below. There will definitely be more design details in the future so please visit again soon!


Wow Brian & Bri! The house of MY dreams is right here! Great job on the design and storyline of its development. Can't wait to see it live! (Your Midwest relateds approve!)